To the many people that have dropped by and made this year another fun event, Happy Halloween!

Friday, November 5, 2010
Tuesday, November 2, 2010
Trick Or Treat Window
Thunder claps in the background, lightening flashes all around, mist rises in the cemetery, ghouls groan and growl, skeletons pop up, a dead man swings, busts sing a ghostly song, a baby screams, a fortune teller speaks, ghosts float overhead and all the while scenes play on the large window above the front door to complete the Halloween sensory overload. Wide-eyed trick-or-treaters take a piece of candy and wander off in a daze. Success!
Come On In And Rest A While

Have a Question? Ask The Crystal Ball
 |
| Dr. Shiver is waiting to reveal all your secrets. |
Bola De Cristal
The animated crystal ball by Gemmy Industries has Dr. Shivers repeating sentences when the microphone is spoken into. This audio-visual gadget adds fun to the Halloween experience, especially when it calls someone by their name or mentions there specific costume. Startled trick-or-treaters cannot discern from where they are being watched which is a clever, nearby spot we will not reveal in this blog.
A Grinning Face, So Inviting
 |
| Step right up! |
Clown Gone Bad
While trick-or-treaters are concentrating on what goodies to choose, this bigger-than-life clown lights up, screams and menacingly drops down to startle them. Here is a view from the front and the side.
Waiting Zombie Ready To Break Ground
 |
| Zombie looking for his next victim. |
Zombie at Work - Ground Breaker
The pneumatic zombie suddenly comes to life, thrusts up, down, back and forth, growls and shakes the ground.
Monday, November 1, 2010
Come Play With Me . . . Heh, Heh, Heh
 |
| Yumm . . . Zombie. Tastes like chicken. |
Nightmare At Jefferyland!
This is the most disturbing of the Halloween attraction. A zombie baby pops up from inside a toy chest that is complete with flies and spider webs. The display is ghoulish, and the pop-up doll completes the horror!
Floating Ghosts Come Out To Play
 |
| Not so eerie in the daylight. |
Something Eerie In The Night Sky
This is one of the favorite attractions for the younger trick-or-treaters. Several ghosts float overhead above the graveyard to the amazement of the watchers who try to figure out how the trick is rigged.
Morbidity Hangs From A Rope
 |
| After a necktie party. |
Just Hanging Out.
This man at the front of the yard is hanging around to the delight of trick-or-treaters. It looks very realistic as its swinging motion causes it to slowly turn in various directions. It is a creepy to watch.
Screaming Skeleton Gets Ready To Scare
 |
| Get ready, get set . . . |
Screaming Skeleton Gets a Rise.
While trick-or-treaters are watching the zombie to its left, a spotlight flashes on and this skeleton pops up with a blood-curdling scream. Its screams are often matched by the screams from startled and unsuspecting onlookers.
I'll Be Your Best Friend. Right!
 |
| Hey you! You in the costume, let me out of here! |
Halloween at Jefferyland - Pleading Zombie
This is one of my favorite Halloween animations. It is a Zombie that is pleading to be released from its coffin. It is played on a computer screen, and as it pleads trick-or-treaters to let it out promising them that if they do he will be their best friend, the coffin lid bangs up and down.
Saturday, October 30, 2010
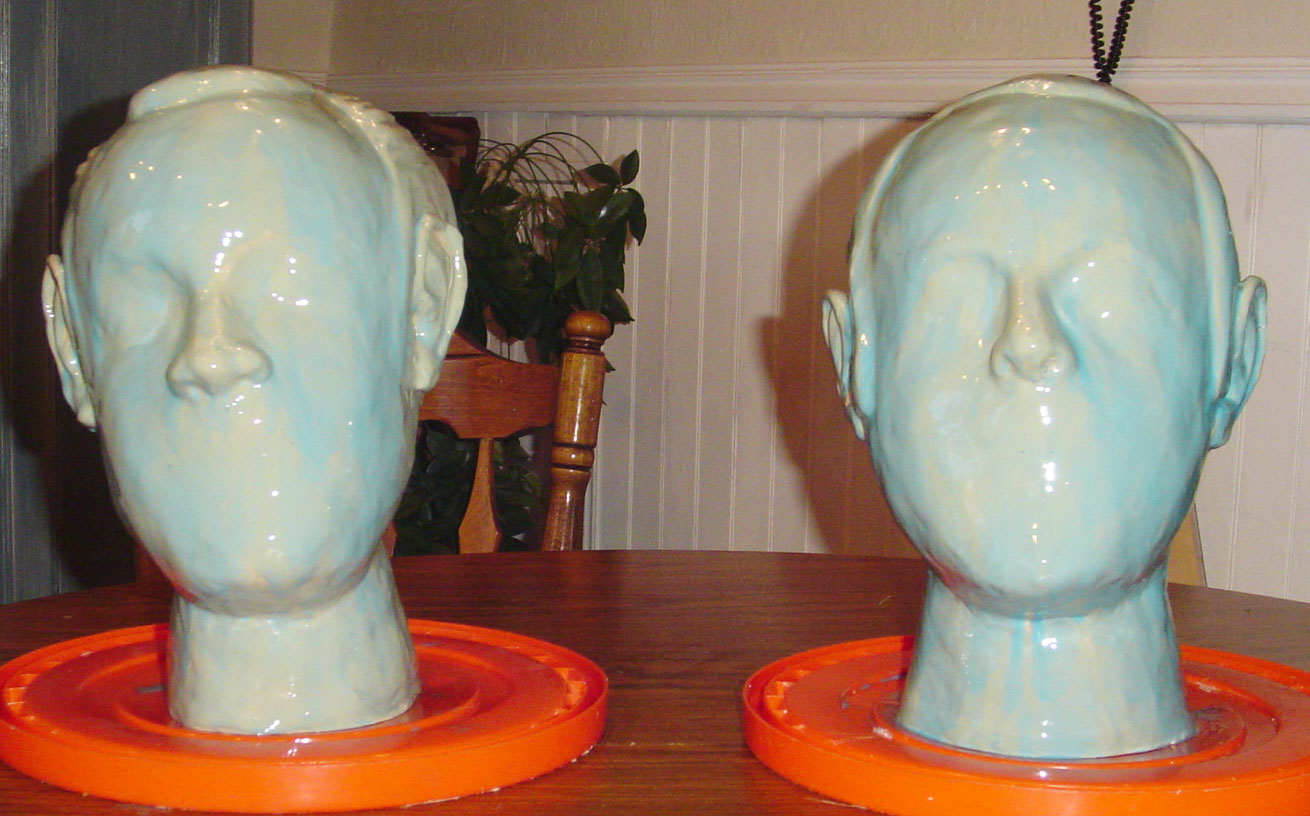
Giving Stone Faces Animation
The heads had good looks, but no personality. They just sat around looking stone-faced. Hook up a projector to a computer, insert the DVD, push play and look at the transformation. Three men come to life as three Grim Grinning Ghosts!
Grim Grinning Heads Waiting To Sing
 Grimm Grinning Ghost heads are perched on their monument waiting to perform for trick-or-treaters in Southern California where the weather is warm and beautiful.
Friday, October 1, 2010
Will I do this again? When Heck Freezes Over!
 |
| Heck frozen over? Oh, no! |
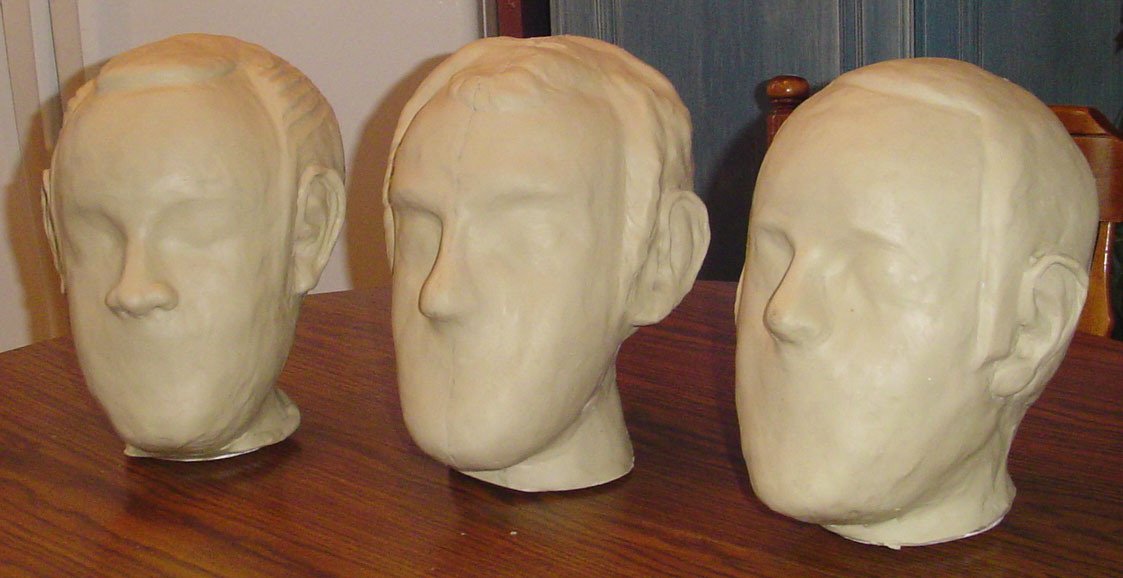
Sculpting and molding the three heads for this project was like giving birth. The first time, you do not know what you are getting into. During the process, you swear you will never do that again. When it is over and you see the child you have created, the pain does not seem so bad.
Was the effort of creating the Grim Grinning Ghosts worth it? Yes! It was a project to have fun with once, learn from and enjoy the results. As far as becoming a sculptor and producing finished works of art, in the future, I will leave that job to others that are more qualified and enjoy making molds. I still have the my molds if I need to make more.
When compared to the Halloween props my son has created, this project was easy. After Halloween I will post some of his creations that make his yard a fun place to visit on the holiday, and many people do!
Wednesday, September 22, 2010
Step Seven – A Good Day to Say Goodbye
On some days things work out especially well. Wednesday was such a day. I took the newly-opened off ramp at 1114 South on the I-15 freeway to the UPS store. A helpful employee helped me carry the three boxes into their store. Each head weighed about 20 pounds. He added additional bubble wrap and packing material to make sure their journey was safe. (They arrived in Escondido on Friday as scheduled by UPS.)
 |
| Go west new men, go west! |
I said, “Goodbye” to my three friends before they traveled into the sunset. This was not a final goodbye to these future Grim Grinning Ghosts because I will see them again at Halloween.
Step Six – Finishing the Makeover
 |
| Stone-Faced Sals |
Monday, September 20, 2010
Summary of Supplies
 |
GP 25 Silicone Base Pro Blue Silicone Catalyst |
Oil-base clay
Styrofoam head
Molds for Casting
GP 25 Silicone Base
Pro Blue Silicone Catalyst
Sports Mesh
Support Mold for Latex
 |
| Part A and Part B Foam |
Part A Foam
Part B Foam
Casting Material
Marble Dust
Dicaperl
WEP (Resin)
Hardener for Polyester Resin
Hardener for Polyester Resin
 |
| WEP Resin and hardener |
Step Five – Making Hot Heads
After learning from the problems I faced when casting the first two molds, this final technique worked the best.
1. Call a friend for help and moral support.
2. Tape the mold tightly together with duct tape, several times around the outside and along all seams.
3. Tape the side of the bucket back together with several rounds of duct tape.
4. Measure how much casting material is needed by filling the mold with water and measuring how much liquid it holds. Mix a little more casting material than the measured amount.
5. I used WEP casting material because I was told it would be lighter and stronger than plaster of Paris-type material. However, it was expensive. I probably would not use it again.
6. Mix 1 gallon WEP resin, ~1 gallon water (a little less), ½ gallon marble dust and ½ gallon Dicaperl (light weight material) and let it sit for 2 hours to let the bubbles rise and dissipate.
7. Gently mix 60 cc catalyst hardener for polyester resin into the marble mixture.
8. Pour enough marble mixture to coat the inside of the mold.
9. Slowly pour in more mixture until mold is about half full.
10. Tip and turn the mold so the mixture can fill the undercuts such as the ears.
11. Continue to slowly fill the mold to the top of the neck. Gently rock back and forth to make sure all areas are filled.
12. Let it settle for a minute and add more mixture if needed. (There was always a small leak).
13. Leave it alone until it sets and hardens, a couple of hours.
14. Remove all the tape.
 |
| Finished mold filled with ~ 3 gallons of marble mixture. |
15. Gently separate the two sides of the mold and remove the hardened head that is HOT from the chemical reaction of the casting materials.
It was harder to remove the heads with the seams going from ear to ear than from back to front.
Monday, September 13, 2010
Step Four – Foaming, Foaming, Foaming
 |
| Making support molds for silicone covered heads. |
After the foam expanded and hardened, I removed the clamps, sawed the top of the foam level with the bucket, removed the tape and pealed the bucket back so I could pry the two sides of the latex-foam mold apart. Before separating the mold, I drilled two holes through the mold near the top above the head and pushed a wooden dowel in each hole to keep the two sides aligned when I put them back together after I removed the clay model. I tested a little foam mixture in a glass jar to see how much it would expand. It expanded about 20 to 1.
It took some effort to remove the flanges, pull the two sides of the mold apart without separating the foam support mold from the silicone and to remove the clay model that ended up pretty much destroyed.
Silicone and More Silicone!
 |
| Silicone masks are done! |
More Silicone and Some Sports Mesh
 |
| Sports mesh and more silicone |
Flanges Wired in Place
 |
| Heads with metal and poster board flanges. |
I will remove the wires after about 3 or 4 coats because the rubbery silicone will hold the flanges in place and the wires will come out more easily than if I remove them after the last coat of silicone hardens.
Step Three – Making Flanges
 |
| Head with poster board pieces at the left and a flange on the right |
Since the movie will be projected on the front of the heads, I want the seam to go from side to side in case the two sides do not line up perfectly.
 |
| Strips of poster board used for a pattern. |
Step Two – Silicone Anyone?
 |
| Two of the heads with one coat of silicone each |
My friend gave me a wonderful kitchen scale so I was able to measure with accuracy. I do not know what I would have done without it.
Here is the process for applying the latex to the clay heads:
1. Mix 1 part silicone catalyst with 10 parts GP 24 liquid silicone base. It has the consistency of honey.
2. Use a two-inch brush with bristles cut to about 1.5 inches long.
3. Paint a thin layer on the heads to protect the clay. (Silicone should be brushed on thin enough to see the clay underneath.
4. Blow with a hair dryer to make sure there are no air bubbles.
5. Clean brush with Bestine
6. Let silicone mixture set for 2 hours.
Three New Friends
 |
| There is more than one way to get a man around the house that sees no evil or speaks no evil. |
Now came the time to start step two, making mother molds, something I knew nothing about but what I had read on the internet. I did not like the itch of fiberglass and the smell of resin permeating my house so I looked for alternatives.
Ear, Ears and More Ears
 |
| Sculpting ears before placing on heads. |
Step One – Not so Painful, but a Bit Suffocating
 |
| Sally gets her makeover. |
 |
| Sally to Sal. |
Sally Triplets Want a Makeover
Summer came and I knew it was time to start the project to be sure it was completed by October 31. Where to start? I went to a beauty supply store, and there was a shelf of Styrofoam heads staring into space. I picked three that wanted to be more that just another pretty face, although their facial appearance looked a bit alien-like. So I rescued them and took them home for a new look and a sex change.
Since I do not have access to a sterile operating room or proper surgical instruments, I made do and turned my kitchen table into a makeshift operating table and found just the right utensils in my kitchen drawers.
 |
| Sally Triplets want a makeover |
No Love Stronger than that of a Mother!
 |
| Three Grim Grinning Ghosts |
Subscribe to:
Posts (Atom)